Wednesday, April 30, 2008

Day 3 - David Ziser's Digital Master's Class

Here we are a lot earlier today! Even though we still ran long (personally I love that as I feel we're getting more bang for the buck, and I'm here in Cincinnati with nothing else to do!)

Well, as teased in yesterday's post, David held true to his word and we're linked to David's blog! Read more about it here...(we're the last two paragraphs.) On that note, David really should be on your "must read" blog list of every day. He puts an incredible amount of time into his blog and it shows - and if nothing else, you get a beautiful picture to look at everyday!

So on to today's recap:

The day started with LaDawn (David's wife) announcing the plans, and showing us the large prints from the day before. She also had set out a back breaking amount of magazine and catalog samples from vendors and sponsors of the class. Then we started the first of three days of DOOR PRIZES!!! We drew 7 names today, and yours truly won! I won the Canon Camera bag (which is good as I'm a Canon guy). The goodie bag included a camera bag fanny pack, a Canon CF Card wallet, Lens Cleaning Kit, Lens Polishing cloth, and some discount coupons and gift certificates. The "big" prize awarded today was copy if IrfanView software (a really neat image browser David demonstrated this week, check them out here.)

Then David came in and we discussed some of the images from yesterday and talked shop about what worked and what didn't and why. Then we got our class images CD and did a full two day shoot review of all the images. These shots included the really beautiful shots, and the ones David shot to illustrate some "bad" examples as well.

From there we got into the meat of the day which was a look at the class software CD all the students get as a part of the class, it includes tons of shareware software and product demos. We looked at all of them and installed some so David could demo them in class. They included the previously mentioned IrfanView, Noise Ninja - a noise reduction software, and LumaPix - a album builder with unbelievable power and ease. Then we began a full in-depth look at things like workflow, salesflow, and an in-depth look at FotoFusion's LumaPix software for album design (the image above is a screen capture of me working on the software using the images from this week - you can learn more about LumaPix here.) We got to play with it and design pages as David and LaDawn walked around assisting us.

Then David presented a Slideshow entitled "Rocket Speed Album Design" fresh on the heels of us experimenting with LumaPix that really made sense and tied the whole thing together.

Tomorrow is all about Marketing, Photoshop and ProSelect Software. Now in reading my materials, I see that we have some homework, but David never mentioned it. Hmmm... should I??????

Tuesday, April 29, 2008

Day 2 - David Ziser's Digital Master's Class

Well, once again it's 10pm and I'm just getting to the room. I'm so mentally and physically spent I can't explain. Let me see if I can recap the day.

Before I go too far, go over and read David's post from yesterday and see if you recognize anyone mentioned there! My wife's bound to get a kick out of me going to someone's house and fixing his PC! He's says I'm going to get linked from his site this week, so we'll see. Guess I'm going to have to start producing some better posts! Here's the link... here

We met at 9:00 again and headed over to the Marriott in downtown Cincinnati. We were given full run of the place and it was very nice. The lobby was up on the 5th floor and had a grand cathedral ceiling with an incredible gazebo type pavilion in the center with a spiral staircase. We shot Sarah, the bride, all up and down the steps and draped all over the gazebo railings and marble columns. There were two large waterfalls in the lobby too that we used to shoot the groom, Pat. Looking for repeating columns and nice compositions, we shot all over the hotel. They also set up a mini "reception" that we could shoot the bows, candles, table settings etc. David taught us how to work the room. Then we had reservations in the hotel cafe over looking the river right across from Paul Brown Stadium. After lunch we continued working the lobby and the gazebo. Around 3pm we headed up to the Presidential Suite on the 15th floor. There were unbelievable shots from an unbelievable location. I shot a nice pano out on the terrace.

We then headed over to the convention center and shot nice window lighting shots and some more repeating pattern shots with columns and windows. After security chased us out after 5:oo pm, and no I'm not kidding, we headed over to Ault Park and shot some more nice outdoor shots with off camera flash. The image above was from the park and we shot there until the sun gave up it's light and half my classmates had hit the wall from exhaustion.

Tomorrow we get to Photoshop the images and get our colors correct. I can't wait to show you the images we get from there. I've been saving the best until we get all the magic working. Sorry I'm not explaining too much - I'm just too tired.

I have some great ideas for future posts though. In talking with several folks here, I've discovered what some of my fellow photographer's are thinking and wondering about, and I happen to know something about! So, it's giving me ideas of things to talk about!

More tomorrow!

Monday, April 28, 2008

Day 1 - David Ziser's Digital Master's Class

This is Sarah, our model for the class. She's a trooper parading around in front of 25 photographers snapping photos as fast as possible while soaking in all David is telling us.

So, how's class? One word.....

WOW!!! It's 10:00 pm as I'm typing this and I'm just getting back to the room! What a day! First let me say that David is one of the nicest guys I've ever met. Down to earth and willing to show/assist/tell you anything - often with a little joke that makes class so easily attentive. We began this morning at 9:30am with introductions from everyone in the class. There are people from all over. My table mates (and so far car mates) are from California and Chicago. Nice guys and we're all getting to know each other. Anyway, we start with intros and then David tells us a little bit about what makes the difference is being different. In other words, what can we do/offer that is different from the competition. We then set out to the temple in last Saturday's post and if you think it looks awesome in the picture, you should see it in person. We worked the room learning how David would view the room and he shot wireless throwing the images up on a portable screen display for us all to chimp back and forth. We could then try the same shots using David's recipe.

From there we headed up to Dree's Pavilion. It's Cincinnati's most popular reception spot and from the view seen above - you can certainly see why. Again, we learned more about how to compose and pose and got some really incredible shots. Some of which I can't show you until later. Then the skies opened up and chased us from the scene. But all was not lost as we then headed to David's house beer/wine/pizza and a review of the day's shots on a giant 10' screen and got to see David edit images and then send downstairs to his in-house printing room where we printed several 24x36 prints. As I started this post....WOW!!!

More as we go, I gotta catch my breath, unload about 677 images I took today, download the mp3 audio file from my voice recorder to the laptop, recharge all my batteries, get some sleep, etc. etc. etc. See you tomorrow...

Saturday, April 26, 2008

Greetings from Cincinnati!

Courtesy David Ziser
Hey gang...

Well this is it, as promised my big month end surprise! I'm in Cincinnati this week studying under one of my heroes and renowned wedding and portrait photographer David Ziser. Many of you know about David from my classes, as I've referred you to his blog many times. Well I have the incredibly fortunate opportunity to be spending the week with David at his Master's Class here in Cincinnati. I'm all geeked up about it, and really looking forward to the opportunity. I'll be blogging all week from the class and sharing what David gives me permission to share. The following is from David's blog last week as it pertains to the class and why I'm so excited to be going.
We are getting closer to my Master Class next week and everything is about ready to go. We are putting the final tweaks on the class workbooks and CD, printing up a few new samples - LaDawn makes me do this every workshop - got to keep things fresh you know, and wrapping the class schedule.

I am thrilled with our first location for our shoot on Monday. We have permission to shoot at Plum Street Temple - one of the most beautiful sanctuary's in the world. It is the third largest Reformed Jewish temple in the world. It is simply magnificent and should be a kick for the class to see. But, hey, I'll keep you updated on that next week...
The image at the top of this post is the temple he's talking about! Stay tuned next week!

Thursday, April 17, 2008

And Just Like That...

Glove Coral from my Saltwater Fish Tank

This came up on another blog I read and I thought it provoked an interesting discussion.

I am interested to know how do you name your pictures. I know for instance some people call a picture depending on the location it was taken at, others with a serial number etc…

I personally tend to do the following:

On the import into Lightroom, it’s gets a descriptive name of the event and a sequence number, and it goes into a descriptive folder name and date subfolder. Then when all the post-processing is done, if there is a real 5-Star photo in the mix, then it gets a title.

For example: Vacations/Disney/6-12-2007/disneyTrip-23.dng and then it might get renamed “A Dream is a Wish Your Heart Makes.dng(or jpg or psd)”

Share your experience and thoughts with me on that !

I'm still here!

Just a quick note to say, that I'm still here. I've been migrating to my new PC and that there really hasn't been much to share lately. Stay tuned though, as I have a wonderful opportunity coming up at the end of the month and I'll be blogging daily to let you guys semi-share what I've been learning.

Until then, you can A) wait for something exciting to happen that I can post about, B) comment or email about something you'd like to see/know/learn, or C) write me off and never return to the site (ouch, just kidding - hope no one chooses C - hey wait, didn't they always tell you choose C when you were unsure? - um - ah - don't choose C - C is a reckless wanton child that runs with scissors and such - please come back....)

Monday, April 7, 2008

Lexar Pro Media on Rebate

Here's Dwight's photo of a lovely dogwood bloom, again in the rain which I think totally adds to the composition.

In a totally blah blog day, the best I could come up with today is a really good rebate deal from Lexar Media (my choice for your camera media cards). You can get a rebate for up to three, so I'm looking at buying three from amazon, getting free shipping, and totaling up the rebates. When all is said and done, I'll get three cards for about the price of one.

Check the out here. Or here. Or here.

Friday, April 4, 2008

5 Questions To Ask Yourself Before Tripping The Shutter

Here's an image Bill took of a mural painted on a building in downtown. The rain once again made for nice color saturation on the paints. The sky, well, what could we do?

Today's Post:

Five (5) key tips that I've learned now take the form of five (5) questions I ask myself before tripping the shutter of my camera.

1. Is my Shutter Speed correct to capture my subject properly?

The key concept here is to capture your subject with the proper degree of sharpness that you’re striving to obtain. Whether you want a sharp photo of your subject or to capture motion blur the first thing you’ll want to do is make sure you have the proper settings in place. Two (2) settings can impact shutter speed: ISO and aperture.

ISO specifies the sensitivity of your sensor/film to light. Lower ISO equating to lower light sensitivity versus higher ISO equating to higher light sensitivity. In general lower ISO settings equate to slower shutter speeds while higher ISO settings equate to faster shutter speeds.

Aperture specifies how wide open the shutter remains when the shutter is released. Smaller aperture settings (ex. f-stop f/22) require longer shutter speeds or longer exposures while large aperture settings (ex. f/2.8) enable faster shutter speeds or shorter exposures.

2. Is my selected Focal Length or my Positioning optimal to capture my subject?

Determining how much you would like your subject to fill your frame is indicated by your choice of focal length and how you position yourself in relation to your subject.

Wider focal lengths (ex. 16mm) have a wider field of view and magnify your subject less while longer focal lengths (ex. 300mm) have a narrower field of view and greatly magnify your subject. Lenses of varying focal length have different optical properties and can add different visual characteristics to a photo if applied creatively. Knowing your subject, how you’d like to present it and choosing the proper focal length can make the world of different. An important thing to remember is that even when you settle on a focal length that your greatest photo accessory can be your feet. Stepping closer or farther away from your subject can drastically change perspective. It is for this reason that you shouldn’t just rely on zooming a lens in and out when lining up your photo.

3. Have I chosen the proper Depth of Field to best highlight my subject?

Identifying what is most/least important to your photo and keeping it in/out of focus is critical to keeping your viewers eye on your subject.

To do this one must again pay attention to aperture. Smaller aperture settings provide greater depth of field. It is for this reason that landscape photographers who want more of a scene in focus will often use a tripod to keep their camera still during longer exposures. Conversely larger aperture settings provide shallower depth of field. It is for this reason that a lot of portraiture and event photographers who want only their subject in focus and a blurred background behind shoot with a larger aperture setting.

4. Is my subject in Focus?

This will seem like a no-brainer, but making sure your subject is in focus is critical. Having a sharp subject enables your viewer’s eye to settle in on an area of visual interest before exploring the rest of the image.

What may not be so obvious is what you focus in on to get a sharp photo. For example the key to sharp wildlife and portraiture photography is making sure the eye of your subject is sharp. In general for expansive scenes with settings for greater depth of field you’ll want to focus in a third of the way into the scene.

5. Have I checked the Edges of my frame to minimize distracting elements?

One of the more interesting characteristics of the human brain is its ability to filter out stimulus that we are not interested in. For some that translates to tuning out what our mother in-law is saying and for others it translates to seeing only what you’re focusing on visually.

After you’ve focused on what is most important to you be sure to check the edges of your photograph for distracting elements. Are there wires, bright spots, poles, people, distracting colors, etc? If so reposition your camera to minimize the presence of these elements. Minimizing distracting elements accentuates the ability of your viewer to focus on what you want them to.

The next time you’re lining up your next shot remember Shutter Speed, Depth of Field, Focal Length / Positioning, Focus, Edges. It may seem like a lot, but with practice thinking through these things becomes second nature and your photography is sure to improve.

Thursday, April 3, 2008

4.3 Second Photo Fix!

This is my mom's picture! Yes, my mom took my class this last time and actually had very nice things to say about it! Anybody else get nervous when your parents judge what you do?!? Anyway, nice job mom!

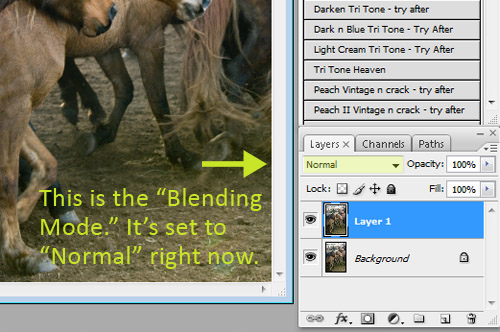
First, open the original photo in Photoshop. (PS, thanks to Pioneer Woman for having the images to illustrate my point! BTW, she's got a killer blog too!)


Next, you’ll want to create a duplicate layer by clicking Control-J (or Command-J on Mac).


Next, notice where the arrow is pointing. That’s the Blending Mode of this layer, called Layer 1. Right now it’s set to Normal. But we’re going to change that.

Click on the little arrow to the right of “Normal” and it will pull up the drop-down menu showing all available Blending Modes. We’re going to change the Blending Mode of Layer 1 to “Soft Light”. And the effect will be immediate! Also try Hard Light on "hard" items (landscapes, non-puppies and kitten animals, men, etc.)

I’ll stop there, but remember that you can keep going with sharpening and some other improvements after that. But often, I like to start off with the Soft Light trick and go from there.

It isn’t the perfect fix for every photo, but more often than not, it’s worth the 4.3 second it takes.

Give it a try, then come back and tell me how you liked it!

Wednesday, April 2, 2008

Adobe Releases Adobe Lightroom 2.0 (Beta)

First, here's another shot from this past weekend's class. I love the bright primary colors and once again, the rain actually made the image. Nice picture.

Now, the demo I included on everyone's CD for Adobe Lightroom became obsolete today, as Adobe has released the new version today. If anyone out there has tried Lightroom and liked it (and how could you not?) I have an offer for you. I have three invitations I can give out that will not expire until the end of the beta session in late 2008. The other version is available to everyone as a 30 day demo. Have fun!

Tuesday, April 1, 2008

SALE ALERT!!!

Here's image number one from the class this weekend. I love the colorful umbrella against the mainly "black and white" image.

That's right, Adorama is clearing house on a bunch of Canon gear! This happens a few times a year, so head on over and see if there are any good deals you can't live without. Here is the Adorama good deal link right here.